Microsoft Powerpoint Tips and Tricks to Increase Productivity

Microsoft PowerPoint (PPT) is one of the widely used presentation tools available.
It comes in handy when presenting personal or company reports, sales demos and many other purposes. Its use ranges from business meetings, conferences to training among others. Ideally, PowerPoint helps to drive the message to your audience effortlessly. However, creating a powerful presentation requires strong PPT skills, and the ability to balance beauty and professionalism to deliver your message. It can take you a few hours or a day to design your presentation perfectly, especially if you need several slides. In this post, we will discuss tricks and tips to enhance your efficiency in preparing a presentation in PowerPoint.
5 PowerPoint Tips for Improving Productivity
- Customize quick access toolbar
- Uniform resize multiple images
- Create a photo album
- Maintain consistent formatting
- Capture screenshots quickly
1. Personalize Quick Access Toolbar
Customizing the Quick Access Toolbar places your frequently used commands within your reach accessing them through their respective menus.
- Click the down-facing “Quick Access” arrow just above the tabs ribbon and select “More Commands…”.

- PowerPoint will open the Options window. Ensure that “Quick Access Toolbar” is selected on the left pane.
- The right-most panel shows the commands already in the Quick Access Toolbar. To add a command, select it in the list on the left and click “Add >>” button.
- To remove any unwanted command by selecting it in the right-side list and click “<< Remove”.
- You can also organize the items in the toolbar by selecting the item, and then click the “Up” or “Down” arrow beside the list.
- Once you have selected all your favorite commands and tools, click the “Ok” button to save the changes.

When you have multiple images or shapes, resizing each item at a time will be a lot of work and some may go out of proportion. There is a way to resize the objects collectively and maintain the proportions of the items.
- Select all the shapes/ images, press and hold the “Ctrl” key on the keyboard and then use the keyboard shortcut “Ctrl + G” to group them.

- Press and hold “Shift” and drag to your preferred size using the mouse.

3. Creating a Photo Album
Using images is one of the most powerful and effective ways to communicate. If you are presenting a project report and you have photos to show, you can create a simple photo album in just a minute.
- Open a blank presentation and on “Insert” select click “Photo Album”.

- Click the “File/Disk” button to add the photos from PC storage, select your photos and then click “Insert”.

- On the “Album Layout” section, specify the number of photos to display per slide, the frame and theme.
- Organize the photos using the up/ down arrow located below the list of the added photos. Once your photo album is set, click “Create”.
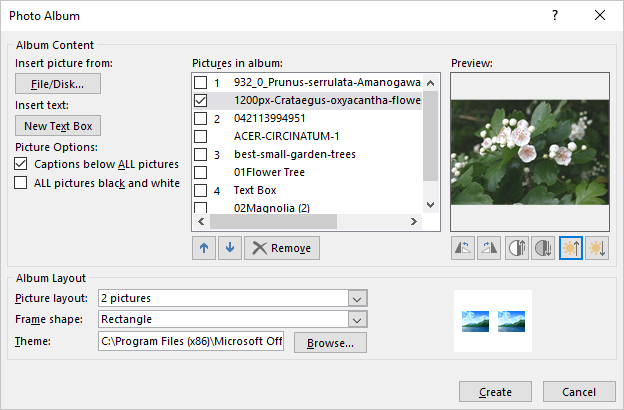
- PowerPoint will organize the photos into slides saving you the hassle of adding inserting each at a time manually.

4. Maintain Consistent Format and Color Profile
Using the same color profile throughout the presentation is a great way to maintain professionalism. However, when you have objects (texts/ shapes) in a different color, you will spend all your time in the color palette trying to identify and match the colors.
- You can use the “Format Paint” to copy formatting and colour of one object and apply it on another.
- Click the object whose theme you want to copy and click “Format Painter” on the home ribbon.

- Click the target object to apply the format.
- Alternatively, you can use the “Eyedropper” tool to identify and match colors.
- Select the item you want to change, go to the coloring format and pick the “Eyedropper”.

- Float your mouse over the target color, and when it appears on the color identifier, click it to apply to the object.

- This can be useful especially when you are limited to your brand colors. The tool will automatically apply the exact color to your object.

5. Quickly Capture Screenshots of Active Programs
Microsoft PowerPoint allows you to directly capture a screenshot of any open windows and automatically add it to your presentation.
- Go to the “Insert” ribbon, expand the “Screenshot” options to view the available windows and select the window you want to screenshot.

- This will capture the full screen of the specified window. You can also use the “Screen Clipping” option to clip a specific section of the window.
Summary
Microsoft PowerPoint can be very handy for any kind of presentation. However, creating an appealing presentation design and communicate effectively with your slide, you have to invest a lot of time and energy. The above PPT tips can help you save time and prepare an outstanding presentation, thus increase your efficiency and productivity.


Comments